Below are some notes on adding sound to PowerPoint presentations. This feature is useful for, among other things, adding background music or narration to slides.
How you start will depend on the nature of the audio you want to add:
- If you are narrating slides, and the narration is fairly simple, you may want to record directly within PowerPoint.
- You may instead choose to record your voice in another application, save the audio to a file, then insert that file into PowerPoint. This is useful primarily if you have an application that allows you to edit the audio to, for example, cut and splice bits of narration. If you only have access to simple audio tools (such as the standard Windows “Sound Recorder” program, available from the Start menu in “All Programs”, then “Accessories”, “Entertainment”, and finally “Sound Recorder”), then you’ll probably be better off recording directly within PowerPoint.
- An exception to this would be the case where you want to keep the audio files separate for some other purpose, since getting audio out of PowerPoint is somewhat more difficult than getting it in.
- If you are adding music or other pre-recorded audio, you simply need to have those files available when working with your PowerPoint presentation. Standard formats like WAV and MP3 are supported.
Recording within PowerPoint
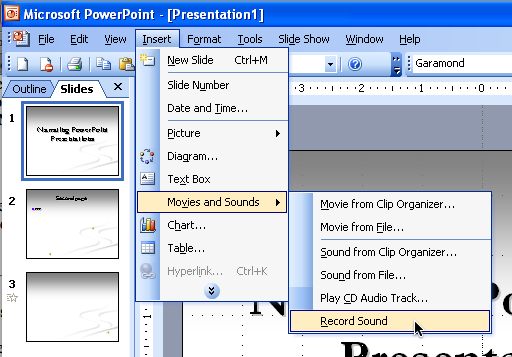
To record directly within PowerPoint, go to the “Insert” menu, choose “Movies and Sound”, then “Record Sound”.
A window will appear with simple controls for starting and stopping recording. By default, the sound will be named “Recorded Sound”. It will be useful later on if you change the name to something more meaningful.
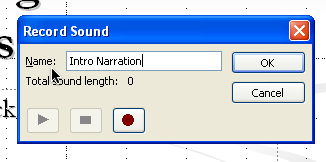
Press the red button to record, and the square blue button to stop. When you’ve finished, you can use the play button (the blue triangle) to listen to the recording. You can also press the record button again to continue recording. Note that this will append to the previous recording, not replace it. If you want to start over, you need to Cancel and then re-open the “Record Sound” window. This limitation is a good example of why you only want to use PowerPoint’s built-in recording capabilities for simple narration. For more complex narration, you will want a tool that allows you to edit what you record.
Once you are finished, click OK. A small speaker icon will appear on the slide, probably in the center. You can drag this to the side or corner of the slide if you like.
If you decide you no longer want a clip of recorded audio, you can select its icon and press the Delete key to remove it from the slide. (Sounds can also be moved from slide to slide by cutting or copying and pasting.)
Inserting Pre-Recorded Audio
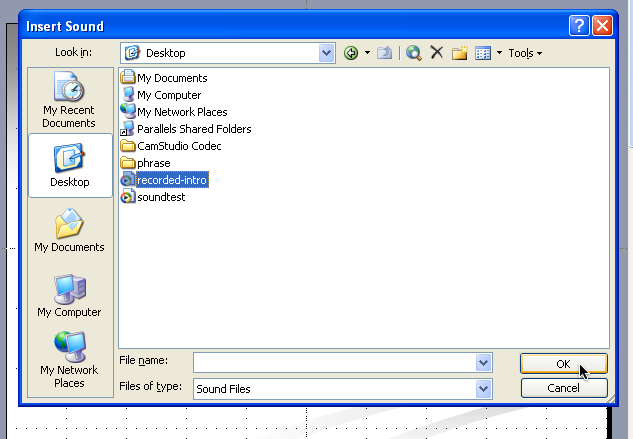
If, rather than recording directly within PowerPoint, you have audio that you recorded and saved in another program or have music files that you want to insert, go to the “Insert” menu, choose “Movies and Sound”, then “Sound from File”. A dialog box will appear from which you can choose the file that you want to insert.
Automatically Playing a Sound when a Slide Opens
If you insert pre-recorded audio from a file, PowerPoint will ask you (right after you select the file) whether you want the audio to play automatically or only when clicked.
If you are recording audio directly in PowerPoint, a couple of additional steps are required to set the recorded sound to play automatically. Choose “Slide Transition” from “Slide Show” menu (or from the pop-up menu of task panes, or by right-clicking on the slide background and choosing “Slide Transition…”). The “Slide Transition” task pane will appear in the right-hand column of the window.
Under “Modify transition”, you will see a popup menu labeled “Sound”. If you click on this popup you will see a list of available sounds, including any sounds that you have recorded within PowerPoint. (This is why it is useful to make sure such sounds have meaningful names.) Pick the sound you want, or “[No Sound]” to prevent any sound from playing when the slide is opened.
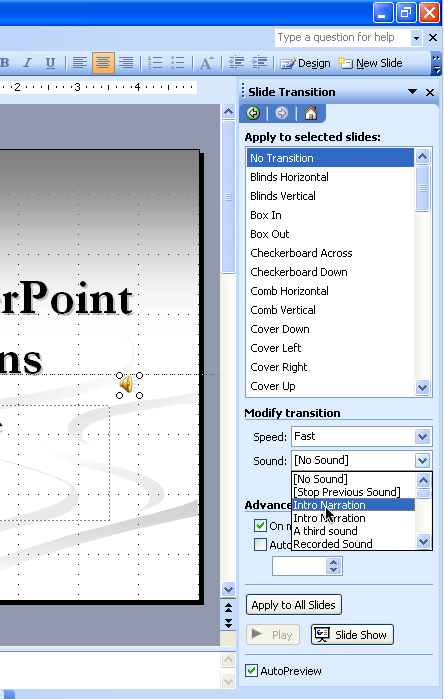
Note that the sound selected here will only play when the slide is opened during a slideshow — it will not play each time you open the slide while you are editing the presentation in “Normal View” mode.
Other Options and Quirks
Even if you set a given sound to play automatically when the slide is opened, it can be played again by clicking on its icon. You can disable this by right-clicking on the icon and choosing “Action Settings”. The following window will appear:
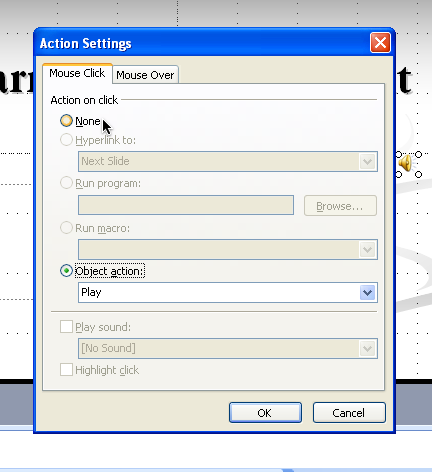
If you choose “None” in this window, nothing will happen when you click the icon. You can also switch to the “Mouse Over” tab and change the setting from “None” to “Object action”/”Play” to cause the sound to play by simply moving the mouse over, but not clicking, the icon.
If you are playing a sound automatically when a slide opens, you may not want its icon to appear on the slide during your presentation. If you right-click on a sound icon and choose “Edit Sound Options”, you will see the following window:
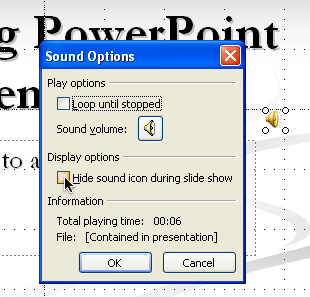
Checking “Hide sound icon during slide show” will hide the icon. Note that if you do this, in slide show mode you will no longer be able to play the sound by clicking on the spot where the icon would be. This means that you can’t do something like cleverly “hide” a sound in a picture on a slide.
Two more quirks:
- PowerPoint seems to remember recorded audio even if you delete a sound icon. Such audio clips will still be available in the “Slide Transition” task pane. This may or may not be a good thing, but suggests (again) that you should give recorded clips meaningful names in the “Record Sound” window.
- Inserting an audio clip will sometimes change your slide layout. To fix this, simply go back to the “Slide Layout” task pane (by choosing “Slide Layout” from the “Format” menu) and re-select the correct layout.